Creating photorealistic renders in Blender
It requires more than just hitting the render button. A proper Blender render setup tutorial involves understanding the intricate balance between render engine configuration, lighting design, material properties, and optimization techniques. Whether you’re working on architectural visualization, product design, or VFX projects, mastering these fundamentals will transform your renders from amateur to professional quality.
Modern Blender workflows demand precision at every stage, from initial scene setup to final output. This guide covers the essential techniques that professional 3D artists use to achieve cinema-quality results, including specific settings, common troubleshooting methods, and performance optimization strategies that can reduce render times by up to 70% while maintaining superior visual fidelity.

Setting Up Cycles Render Engine for Maximum Quality
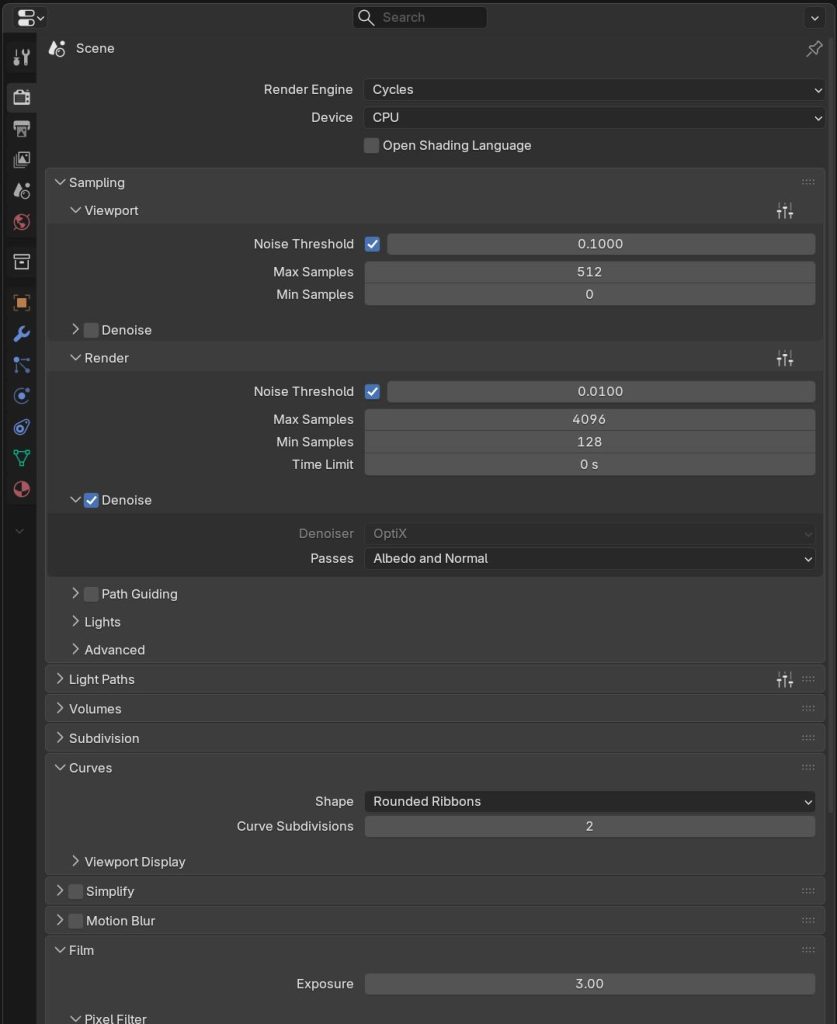
The Cycles render engine serves as the foundation for photorealistic rendering in Blender. Proper configuration starts with understanding the relationship between sampling, noise reduction, and render times. Navigate to the Render Properties panel and select Cycles as your render engine. For professional results, set your sampling values strategically rather than using default settings.
Configure your sampling settings based on scene complexity. For final renders, use 2048-4096 samples for complex scenes with multiple light bounces, glass, and subsurface scattering materials. Simple product renders may only require 512-1024 samples. Enable Adaptive Sampling with a noise threshold of 0.01 for balanced quality and speed. Set the minimum samples to 128 to ensure adequate coverage in darker areas.
Light path configuration directly impacts render quality and performance. Set Max Bounces to 12 for most scenes, with Diffuse and Glossy bounces at 4-6 each. Increase Transmission bounces to 8-12 when working with glass or transparent materials. For scenes with volumetric effects, set Volume bounces to 2-4. These settings provide realistic light behavior without excessive computation overhead.
Denoising algorithms in Blender 2026 offer significant quality improvements. Enable OptiX denoising if using NVIDIA RTX graphics cards, or Open Image Denoise for CPU rendering. Configure denoising for both viewport and final renders.
Device Configuration and Performance Settings
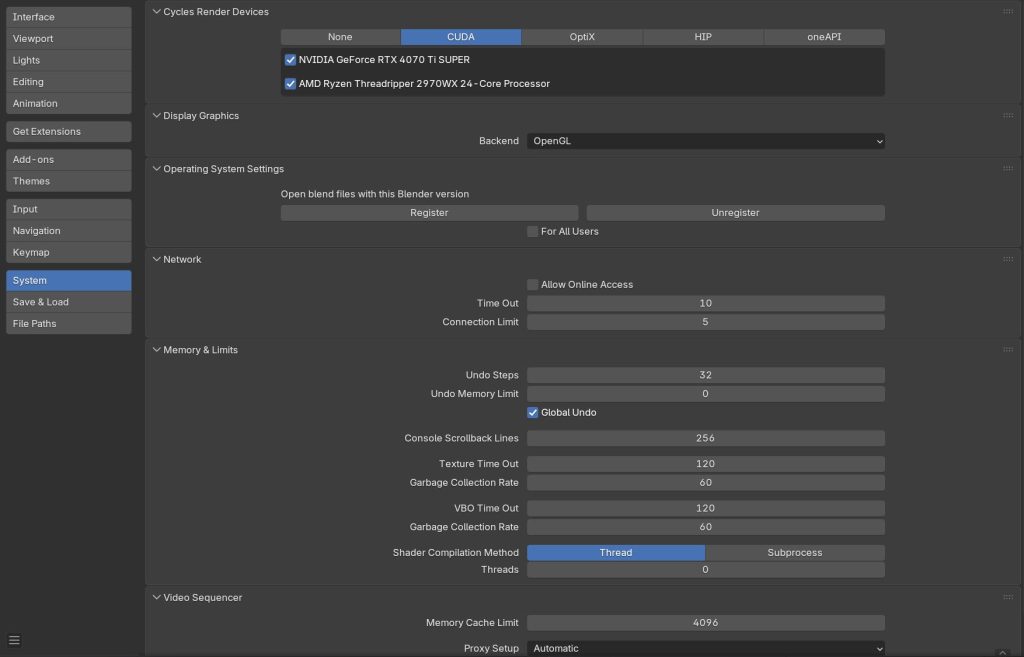
Modern GPU rendering capabilities require proper device configuration for optimal performance. Access Edit > Preferences > System and select CUDA or OptiX for NVIDIA cards, or OpenCL for AMD. Enable all available GPU devices while keeping CPU enabled for hybrid rendering on complex scenes. This configuration typically provides 5-10x faster render times compared to CPU-only rendering.
Essential Lighting Techniques for Realistic Renders
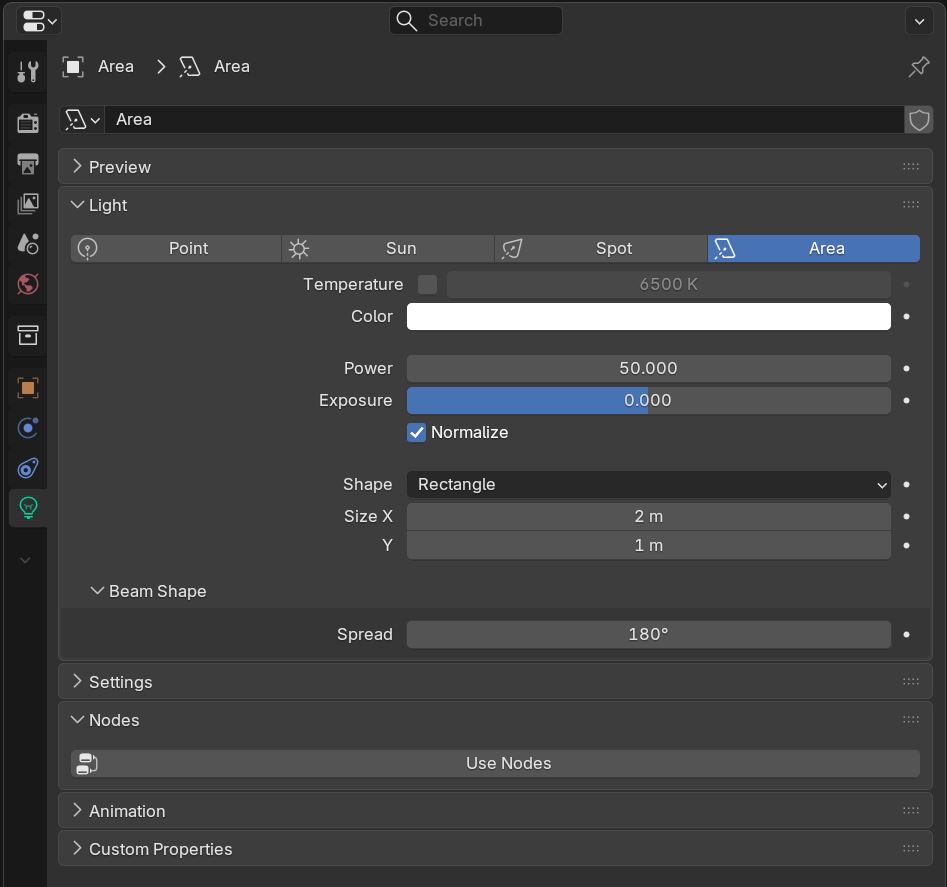
Professional lighting setups form the backbone of photorealistic rendering. The three-point lighting system remains fundamental, but Blender’s node-based approach allows for sophisticated variations. Start with a strong key light using an Area Light with 50-100 watts power, positioned at a 45-degree angle from your subject. This creates primary illumination and defines the main shadow patterns.
Environmental lighting through HDRI maps provides realistic illumination and reflections. Load high-quality HDRI environments in the World Shader Editor using an Environment Texture node connected to a Background Shader. Rotate the HDRI using a Mapping node to control sun direction and shadow angles. Professional HDRI maps at 8K resolution offer superior dynamic range and detail for reflective surfaces.
Fill lighting prevents harsh shadows while maintaining realistic contrast ratios. Use Area Lights with lower intensity (10-25 watts) positioned opposite your key light. Alternatively, add subtle ambient lighting by increasing the HDRI strength to 0.3-0.8. Avoid overlighting, which flattens the image and reduces visual impact. Professional renders maintain shadow areas that provide depth and dimensional information.
Accent lighting adds visual interest and guides viewer attention. Use targeted Spot Lights or small Area Lights to highlight specific elements like product details or architectural features. Keep accent light intensity low (5-15 watts) to avoid overwhelming the main lighting setup. Color temperature variation between lights creates more natural-looking illumination – use warmer tones (2700K-3000K) for artificial lights and cooler tones (5000K-6500K) for daylight simulation.
Material and Texture Configuration Best Practices
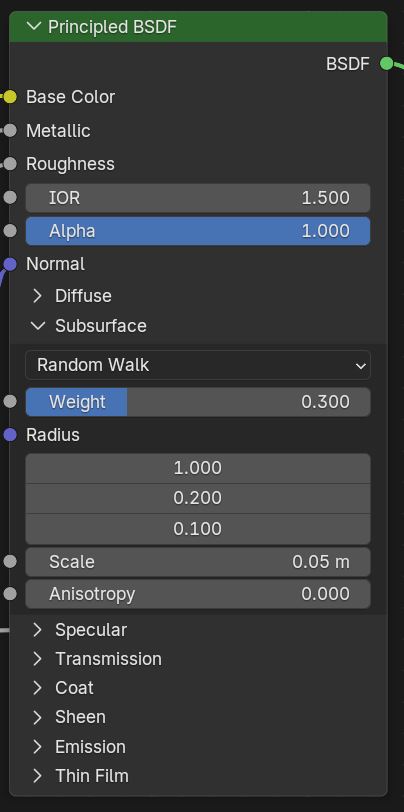
Physically Based Rendering (PBR) materials require precise configuration to achieve photorealistic results. The Principled BSDF shader provides industry-standard PBR workflow compatibility. Start with proper base color values – most real-world materials have base color values between 30-240 in RGB, never pure black or white. Metallic materials should have base colors in the 180-255 range with metallic value set to 1.0.
Texture resolution significantly impacts final render quality. Use 4K textures as the minimum for hero objects and close-up shots, with 8K textures providing superior detail for extreme close-ups or large-scale surfaces. Professional 3D assets typically include multiple resolution options, allowing you to balance quality with memory constraints. Organize textures in material groups to maintain consistent naming conventions and easy management.
Roughness and normal map configuration requires careful attention to achieve realistic surface properties. Roughness values should range from 0.1-0.9 for most materials – pure 0.0 creates unrealistic mirror surfaces, while 1.0 produces overly diffuse materials. Connect Normal Map nodes with strength values between 0.5-2.0 depending on the desired surface detail intensity. Use ColorRamp nodes to fine-tune roughness variation across surfaces.
Subsurface scattering brings organic materials to life. For skin rendering, use subsurface values of 0.1-0.3 with appropriate radius values – typically 1.0, 0.2, 0.1 for red, green, and blue channels respectively. Wax, marble, and translucent plastics benefit from subsurface scattering with radius values adjusted based on material thickness and translucency requirements.
Texture Mapping and UV Optimization
Proper UV mapping ensures textures display correctly without distortion or seams. Use angle-based unwrapping for organic shapes and projection methods for architectural elements. Maintain consistent texel density across UV islands – aim for 512-1024 pixels per meter for architectural visualization, or 2048+ pixels per meter for product close-ups. Proper UV layout maximizes texture resolution utilization and minimizes wasted space.
Texture coordinate systems affect how materials respond to object transformations. Use Generated coordinates for procedural materials that should scale with objects. Object coordinates work well for textures that should remain fixed relative to object centers. UV coordinates provide the most control but require proper UV mapping. Global coordinates create world-space effects useful for environmental materials like dirt accumulation or wear patterns.
Camera Settings and Composition for Professional Results
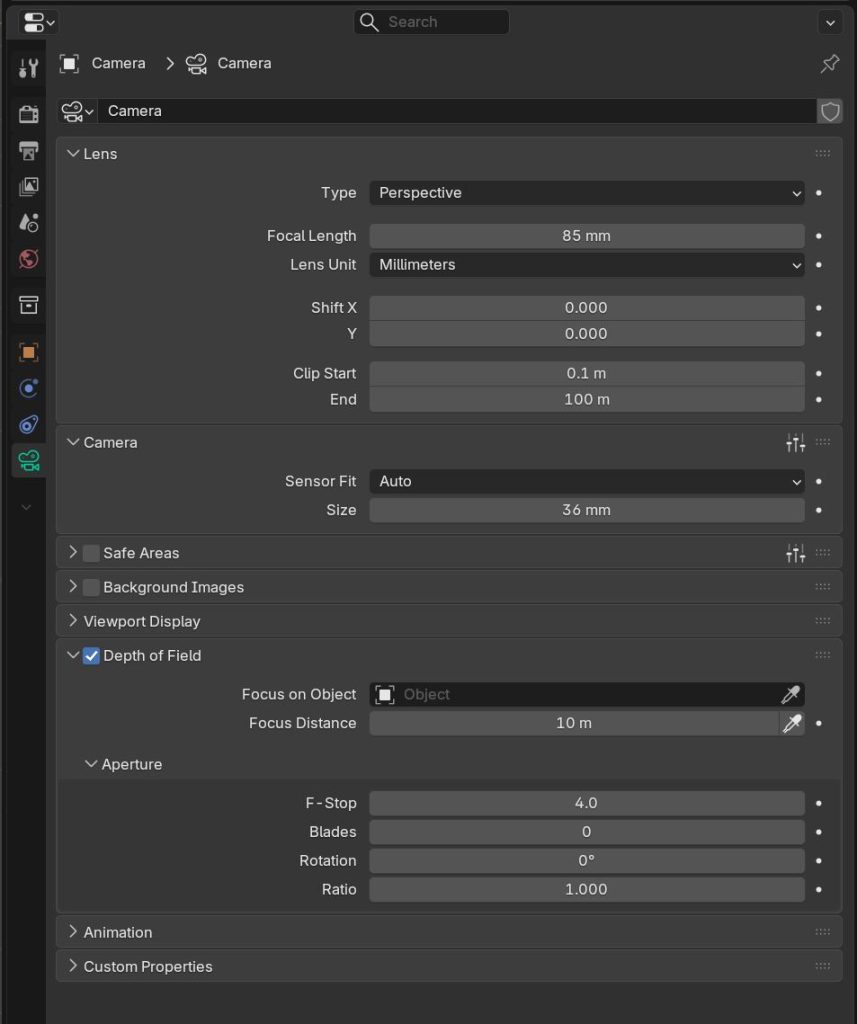
Camera configuration directly influences the photographic quality of your renders. Professional cameras use specific focal lengths, aperture settings, and sensor characteristics that should be replicated in your virtual setup. Set focal lengths based on your composition goals – 35mm for environmental shots with context, 50mm for natural perspective matching human vision, 85-135mm for product photography with minimal distortion.
Depth of field creates visual hierarchy and focuses attention on key subjects. Enable Depth of Field in camera settings and use aperture values between f/1.4-f/8 depending on desired blur intensity. Position the focus object precisely using the Focus Object field or manual distance settings. Large aperture values (f/1.4-f/2.8) create shallow depth of field ideal for product shots, while smaller apertures (f/5.6-f/8) maintain sharpness across architectural scenes.
Camera sensor simulation adds photographic authenticity to renders. Adjust sensor size to match real camera specifications – full frame (36x24mm), APS-C (23.6×15.6mm), or medium format (44x33mm) depending on your target aesthetic. Larger sensors create different depth of field characteristics and field of view relationships that affect the overall image feel.
Composition techniques from photography apply directly to 3D rendering. Use the rule of thirds, leading lines, and framing elements to create visually compelling images. Enable camera guides in the viewport to visualize composition grids. Consider foreground, middle ground, and background elements to create depth layers that enhance three-dimensional perception.
Render Optimization and Post-Processing Tips
Render optimization balances quality with efficiency through strategic scene management. Use instancing for repeated objects to reduce memory usage – forest scenes with thousands of trees should use particle systems with instanced objects rather than individual meshes. Level of detail (LOD) systems automatically reduce geometry complexity based on camera distance, maintaining visual quality while improving performance.
Render region and border rendering accelerate iteration during material and lighting development. Use Render Region (Ctrl+B) to test specific areas without rendering the entire frame. This technique proves particularly valuable when fine-tuning complex materials or lighting setups. Combine with lower sampling settings during development, then increase samples for final renders.
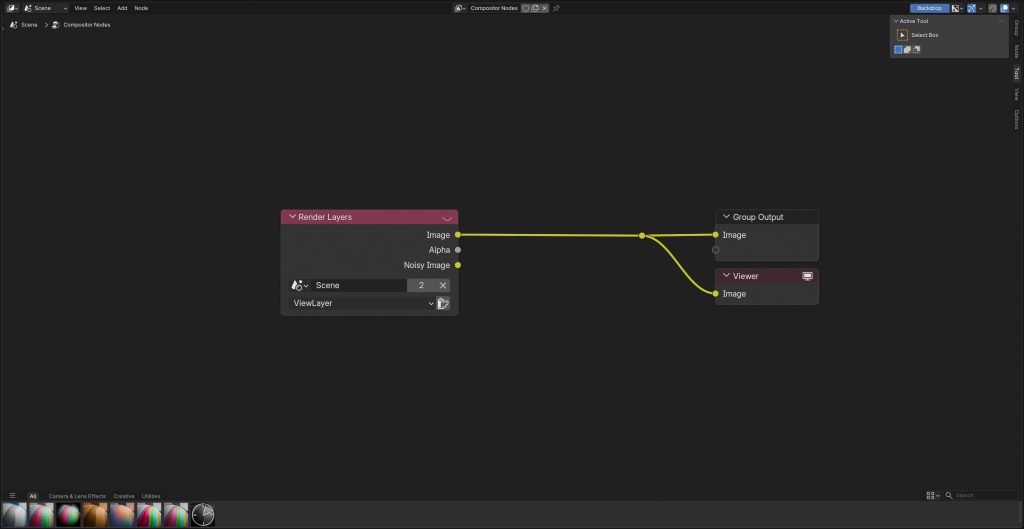
Render passes provide flexibility in post-processing and compositing. Enable essential passes like Diffuse, Glossy, Emission, and Environment for re-lighting capabilities. Cryptomatte passes allow precise object selection in compositing applications. Shadow catcher passes enable seamless integration of 3D objects into photographic backgrounds. Use render layers to separate complex scenes into manageable components.
Memory optimization prevents crashes during large scene rendering. Use texture compression and streaming techniques for scenes with extensive texture libraries. Reduce subdivision surface levels during rendering using the Render modifier settings. Enable GPU memory optimization and consider using external rendering services for scenes exceeding local hardware capabilities.
Post-Processing Workflow Integration
Blender’s Compositor enables advanced post-processing without external applications. Create node groups for color correction, tone mapping, and artistic effects that can be reused across projects. Use Color Balance nodes for temperature and tint adjustments, and ColorRamp nodes for contrast enhancement. Glare nodes add realistic camera artifacts like lens flares and bloom effects.
External compositing workflows provide additional control and compatibility with professional pipelines. Export OpenEXR files with all render passes intact for use in applications like Nuke, After Effects, or DaVinci Resolve. Linear color space workflows maintain color accuracy throughout the post-processing chain. Apply final color grading and output formatting in dedicated compositing applications for maximum control.
Quality Control and Final Output
Professional quality control involves systematic checking of render elements before final delivery. Examine renders at 100% magnification for noise, artifacts, or texture streaming issues. Verify that normal maps display correctly without seams or inversion artifacts. Check shadow quality and ensure denoising hasn’t removed important detail from surfaces or textures.
Output format selection affects final image quality and compatibility. Use OpenEXR for maximum dynamic range and professional workflows, PNG for web delivery with transparency support, or JPEG for compressed delivery where file size matters more than absolute quality. Set appropriate color space output – sRGB for web and standard displays, Rec.709 for broadcast, or ACES for professional film workflows.
Conclusion
Mastering Blender render setup requires understanding the interconnected nature of render engines, lighting, materials, and optimization techniques. The techniques covered in this guide provide a solid foundation for creating professional-quality renders that rival commercial rendering solutions. Remember that consistent practice with varied subject matter will develop your intuitive understanding of how these systems work together.
The quality of your source assets significantly impacts final render results. CGAxis All-Access subscription provides access to over 12,600 production-ready 3D models, 8K PBR materials, and HDRI environments that integrate seamlessly with these rendering workflows, ensuring your technical skills translate into visually compelling results that meet professional standards.


