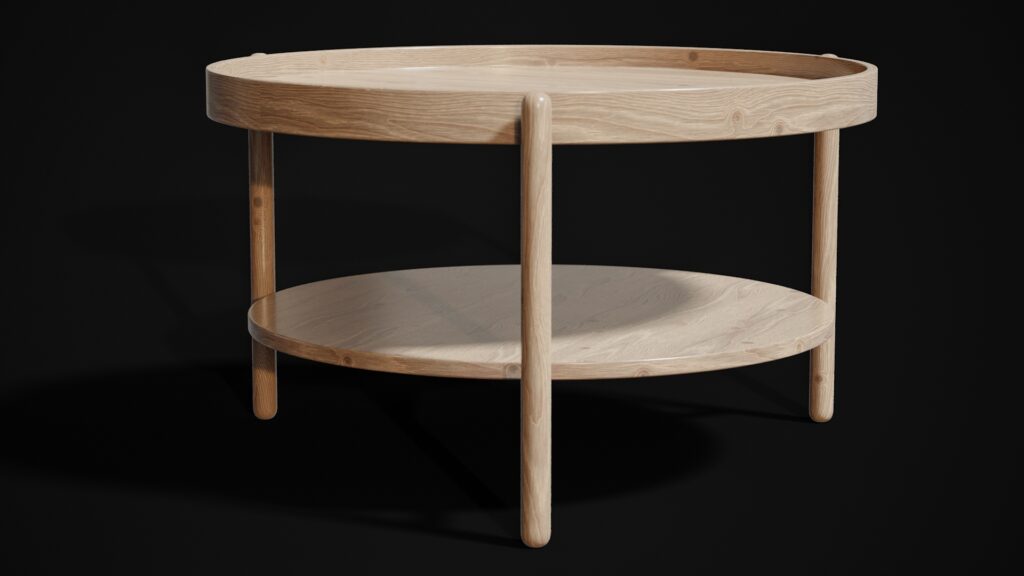
Creating realistic wood surfaces in Blender requires understanding how wood PBR materials work with the software’s powerful shader system.
Whether you’re developing architectural visualizations, game assets, or product renders, mastering wood PBR materials in Blender will significantly enhance the realism of your 3D scenes. This comprehensive guide walks you through the technical process of implementing professional wood materials using physically-based rendering principles.
Wood materials present unique challenges due to their complex surface characteristics – from subtle grain patterns to varying roughness values across different species. Modern PBR workflows solve these challenges by using multiple texture maps that work together to simulate real-world material properties. By the end of this tutorial, you’ll know how to set up sophisticated wood materials that respond naturally to lighting conditions.
Understanding Wood PBR Material Components
PBR materials consist of several essential texture maps that define how light interacts with wood surfaces. The diffuse map (also called albedo or base color) contains the pure color information without any lighting or shadow details. For wood materials, this map captures the natural color variations, grain patterns, and species-specific characteristics like the rich browns of walnut or the pale yellows of pine.
The normal map creates the illusion of surface detail by manipulating how light bounces off the material. Wood normal maps encode the subtle bumps and grooves of grain patterns, knots, and surface imperfections. High-quality normal maps can make a flat polygon appear to have deep wood grain without adding geometry. When working with wood PBR textures, normal maps typically range from 2K to 8K resolution to capture fine grain details.
The roughness map controls how glossy or matte different areas of the wood appear. Raw wood surfaces have varying roughness – grain lines might be rougher than the smooth areas between them. Finished wood surfaces like lacquered furniture require different roughness values than weathered barn wood. This map uses grayscale values where white represents maximum roughness (completely matte) and black represents minimum roughness (mirror-like reflection).
Additional maps enhance realism further. Metallic maps remain mostly black for wood since wood contains no metallic properties. Specular maps fine-tune reflection intensity, while displacement maps can add actual geometric detail for close-up renders. Premium wood material collections often include ambient occlusion maps to enhance shadow detail in crevices and grain patterns.
Preparing Your 3D Model: UV Mapping and Mesh Considerations
Proper UV mapping forms the foundation of successful wood material application. Wood textures must align naturally with the object’s geometry – imagine how real wood grain would flow across a table surface or cabinet door. For furniture pieces, UV seams should follow logical edges where wood joints would naturally occur in real construction.
When UV unwrapping wooden objects, consider the scale relationship between your texture resolution and model size. A 4K wood texture applied to a massive tree trunk will appear too fine, while the same texture on a small jewelry box might show excessive grain detail. Calculate your texel density (texture pixels per world unit) to maintain consistent material scale across different objects.
Mesh topology affects how wood materials render, especially when using displacement mapping. Ensure adequate geometry density in areas where displacement will create surface detail. A general rule: your mesh should have enough vertices to support at least 50% of your displacement texture’s resolution. For example, a 2K displacement map requires roughly 1K vertices in the affected area for optimal detail.
Edge flow considerations become critical for wooden planks, beams, or boards. UV islands should follow the wood grain direction, allowing textures to flow naturally along the length of boards. Avoid stretching UVs across sharp bends or curves where wood would naturally break or bend differently than your digital geometry suggests.
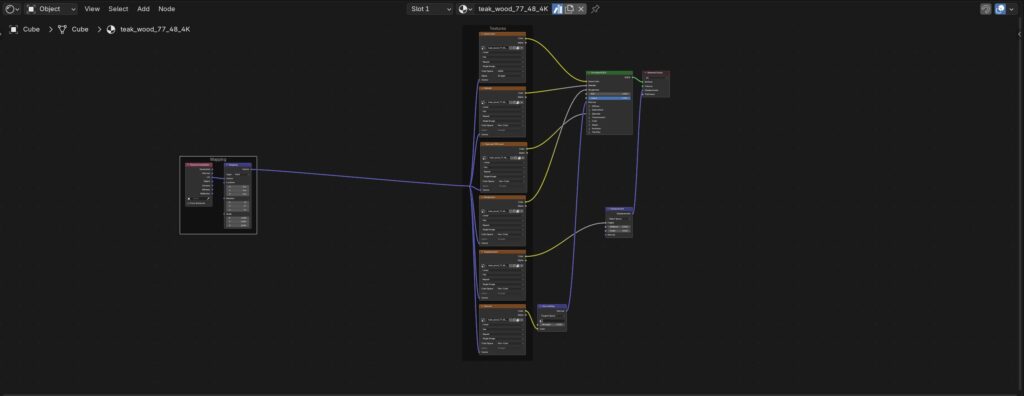
Setting Up Wood Material Nodes in Blender’s Shader Editor
Begin by adding a new material to your object and switching to the Shading workspace. The foundation of any wood PBR material starts with the Principled BSDF shader, which handles most PBR properties efficiently. Connect your diffuse texture through an Image Texture node to the Base Color input, ensuring the Color Space is set to sRGB for accurate color reproduction.
For the normal map, add an Image Texture node and set its Color Space to Non-Color Data. Connect this to a Normal Map node, then link the Normal Map node’s output to the Principled BSDF’s Normal input. The Normal Map node’s Strength value controls the intensity of surface detail – start with 1.0 and adjust based on your lighting conditions and viewing distance.
Roughness setup requires another Image Texture node set to Non-Color Data, connected directly to the Roughness input. Wood materials typically use roughness values between 0.3 (polished hardwood) and 0.9 (weathered lumber). You can multiply the roughness map with a ColorRamp node to fine-tune the overall roughness range without editing the original texture.
Here’s the step-by-step node setup process:
- Add three Image Texture nodes for diffuse, normal, and roughness maps
- Set the normal and roughness texture nodes to Non-Color Data
- Connect diffuse texture to Principled BSDF Base Color
- Add a Normal Map node between normal texture and Principled BSDF Normal input
- Connect roughness texture directly to Principled BSDF Roughness
- Set Metallic to 0.0 (wood contains no metallic properties)
- Adjust Specular to 0.5 for most wood types (higher for exotic hardwoods)
Advanced users can enhance this basic setup with additional nodes. A ColorRamp node after the diffuse texture allows color grading without modifying source images. Mixing multiple wood textures using a Noise Texture as a factor creates natural variation across large surfaces. The key is maintaining the physical accuracy that makes PBR materials respond correctly to different lighting scenarios.
Rendering and Lighting Tips for Photorealistic Wood Surfaces
Wood materials respond dramatically to lighting conditions, making proper illumination crucial for photorealistic results. Use HDRI lighting for exterior wood scenes to capture the complex light interactions that make wood grain visible. Interior scenes benefit from area lights positioned to graze wood surfaces at shallow angles, emphasizing texture detail and grain patterns.
Avoid common lighting mistakes that flatten wood materials. Direct frontal lighting eliminates the shadows that define grain detail, while purely ambient lighting lacks the directional quality that makes wood appear three-dimensional. Position key lights at 30-45 degree angles to wood surfaces, creating subtle shadows that reveal surface complexity.
Render settings significantly impact wood material quality. Enable denoising to maintain fine grain detail at reasonable sample counts (256-512 samples often suffice). The Cycles render engine handles wood materials more accurately than Eevee for final renders, particularly regarding light penetration and subsurface scattering effects in thin wood veneers.
Camera considerations affect how wood textures appear in final renders. Close-up shots require higher resolution textures (4K-8K) to maintain detail, while distant shots can use 2K textures without quality loss. Consider your final output resolution – 8K textures provide minimal benefit for 1080p output but become essential for 4K or print work.
Color space management ensures accurate wood color reproduction. Set your project to ACES color management for professional workflows, or use Filmic for stylized renders. Wood colors often appear oversaturated in sRGB space, requiring careful color grading in post-production or material adjustment during the setup phase.
Optimizing Your Wood Material Workflow
Efficient wood material creation starts with organizing your texture library systematically. Group materials by wood species, finish types, and resolution levels. This organization becomes essential when working on large projects requiring consistent material application across multiple objects. Professional workflows often include material naming conventions that specify wood type, finish, and intended use case.
Texture memory optimization becomes critical in complex scenes with multiple wood materials. Use texture coordinate tricks like rotating or scaling UV coordinates to create variation without loading additional texture files. The Mapping node provides precise control over texture placement and can simulate different plank widths or board orientations from a single texture set.
Consider using professional PBR texture assets that include multiple resolution options and complementary material variations. High-quality texture packs save significant time in material creation and ensure consistent quality across projects. Look for collections that include seamless tiling textures for large surface coverage and detail textures for close-up work.
Conclusion
Mastering wood PBR materials in Blender requires understanding both the technical aspects of PBR workflow and the visual characteristics that make wood materials convincing. From proper UV mapping through advanced weathering techniques, each step contributes to the final realism of your rendered wood surfaces. The combination of high-quality texture maps, thoughtful node setup, and appropriate lighting creates wood materials that respond naturally to various rendering scenarios.
Professional 3D artists rely on efficient workflows that balance quality with productivity. Building a comprehensive library of wood materials using these techniques accelerates project development while maintaining high visual standards. Whether you’re creating architectural visualizations, product renders, or game assets, these wood material techniques provide the foundation for photorealistic results.
Ready to elevate your wood material library? Explore the CGAxis All-Access subscription for unlimited access to professional wood textures, seamless materials, and comprehensive PBR collections that integrate perfectly with these Blender workflows. Professional-grade textures combined with these advanced techniques will transform your wood material quality and streamline your creative process.


